Friday, August 29, 2014

Polka Dot Flower Mani


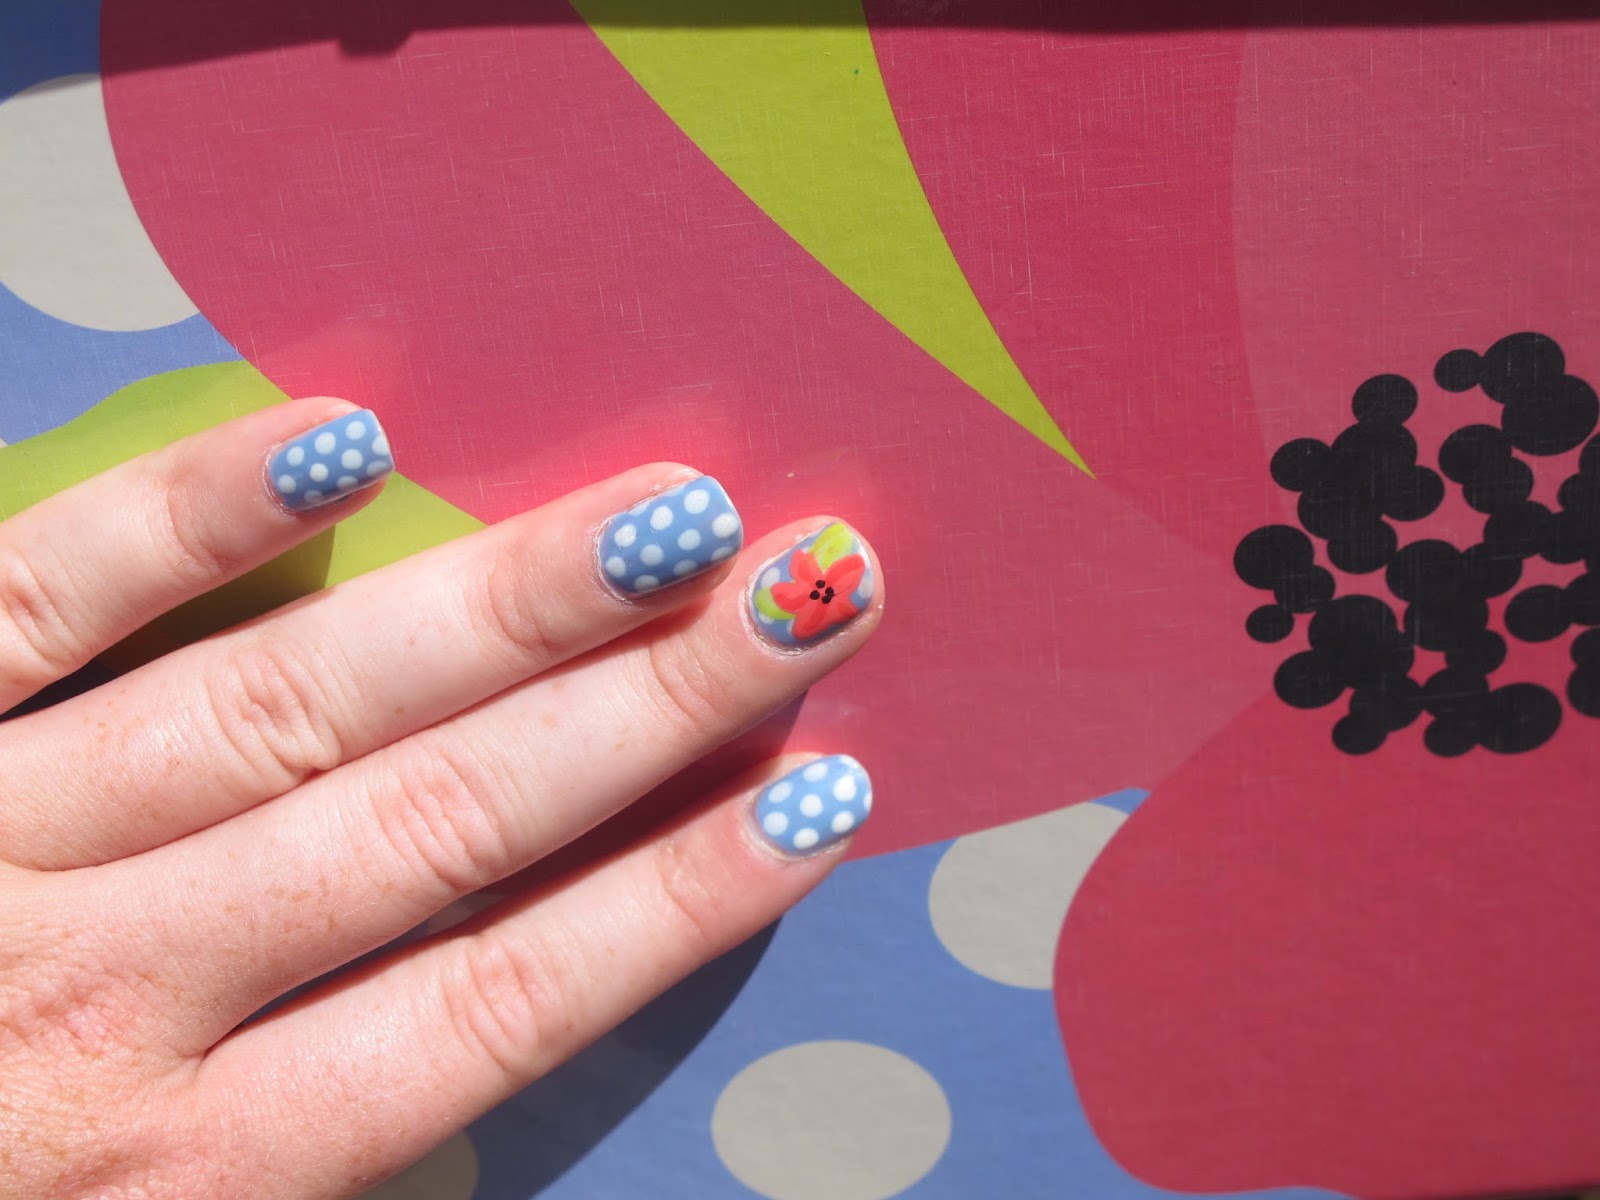
Here is my how to for my polka dot flower mani.  It was inspired by an organizer I bought from Target and I have been starring at it for a few months thinking it would look really good on my nails.  It does!


For this mani I used Nail Tek Intensive Therapy II as a basecoat (as always).  For the background I used Ulta Bam-Blue-Zled and Essie Marshmallow.  For the leaves I used Black Poppy Jade Polish and Sinful Colors Innocent.  For the flower I used Sally Hansen X-treme Wear Coral Reef (my new favorite color, expect to see this again), Ulta Eye Popping Poppy, and Maybelline Color Show Onyx Rush.  As usual Essie Good to Go top coat.


Start out by painting all nails with the basecoat and Bam-Blue-Zled.  Take a medium dotting tool, or a  flat side of a toothpick would work to make off-white dots on all the nails.  


Use the jade to make two little triangles on each nail getting the flower, I did my middle finger and thumb.  Then use the brighter green for little accent lines.


Use a little brush to make petals, five for each with the coral reef.  Then use a brighter pink for accent lines on each petal to create some dimensions.  


Take the small doting tool to create some little dots in the middle of the flower.  


I am really happy with how it came out!!!! 


My left hand usually always looks so good and my right hand looks like it was done by a 4 year old, dang lack of coordination.  But I am pretty surprised at how good the thumb came out on my right hand!

If I do say so myself my nails matched the organizer pretty well.  I hope you agree.


Tuesday, August 19, 2014

Super Easy Peach and Turqoise Chevron


This is super super easy.  All you need is nail polish and Chevron stickers or stencils. I use nail vinyls from http://nailvinyls.com/.  Super awesome sight that has chevron, straight, lightning bolt, and all other kinds of nail vinyls.  I just bought straight and right angle ones.  So excited!!!


I used NailTek Intensive Therapy II as a base coat.  The peach is China Glaze Flip Flop Fantasy. The first turquoise (I only used because the glitter is very transparent) is Sally Hansen's X-treme Wear Marine Scene.  The glitter turquoise is Finger Paints Art You Wondering? Lastly, the top coat is China Glaze Fast Forward Top Coat. 


Paint all nails but one, your choice ring or middle finger.  I like to put a top coat over it before the next step, but that's jut me. 


Paint turquoise on the finger without polish.  Then take the stickers or stencil, whatever you are using.  On your ring finger and thumb. 


Paint the turquoise on top of the chevron stickers. Then paint the turquoise glitter over the turquoise on the chevron stickers and middle finger. 


An taaa-daaaa!!! Wait until it dries and put the top coat on.  It's that easy and it looks super awesome.  My boyfriend makes fun of me for doing all this and being so obsessed with nails, but he decided to take some fun pictures of my mani.


Thursday, August 7, 2014

Bumble Bee


Happy Thursday! I love summer and its great for all of these nail designs.  My least favorite part is the bugs, but fortunately for them their nail designs look super cute.  In the spring I did a lady bug design that I loved!  


For this mani I used Nail Tek Intensive Therapy II for a basecoat, the yellow is Ulta's Sun-Sational, blacks is Utla's Little Black Dress, pink is Ulta's Eye Popping Poppy, white is China Glaze's White on White, and top coat is Essie's Good to Go.  For this you also need a small, medium, and large dotting tool, nail tape, and a sponge.


Start with the yellow on all nails. 
For the flower, I waned to practice first.  The benefit of having toes as well is that I can practice my designs there, plus I just got a pedicure!  To do the flower use the medium dotting tool and drag each petal towards the center of the flower. 


Do this 5 times and let it dry for a few seconds.  Take the large dotting tool and dot a fun color in the center of the flower.  I did pink, but I was debating to do that or purple. 


For the bee trail on the ring and middle fingers I used the smallest dotting tool.  Make small dashes in fun lines and swirls to make it look like the bee was flying all over.


Now the fun part... for the actual bee, cut strips of nail tape and place on pinky and thumb.  Make sure to leave space on both ends for face and stinger.  The wrap your fingers in scotch tape or painters tape for easy cleanup.

  
Apply the black tape to the sponge and gently dab onto both nails.  You may want to do two or three coats depending on how transparent the polish is. 


Gently remove the tape from your fingers and nails.  It is better to do this when the polish is wet.


Use the medium dotting tool to put two white eyes on each bee.  Then take the small dotting tool and use black to add pupils.  And now you have a beautiful bumble bee mani!


Friday, August 1, 2014

Tropical Sunrise


I'm pretty excited about to do my first actual DIY nail post.  I love these and they are pretty easy to do, but look awesome!  I tried a new lighting system for my pictures, sorry if the color is a little off, it will be a learning experience for me.  Also if you have any suggestions on how to make my posts more helpful let me know! I have never been the blogging type. To do this mani I used a variety of polishes (I am not one to stick to just one brand).  As a basecoat I used Nail Tek's Intensive Therapy II.  The colors are Sally Hansen's Mellow Yellow, Orly's La Vida Loca and Terracotta, OPI's Sheer Tint Top Coat- I'm Never Amberrassed, and my favorite- Essie's Good to Go top coat.


I started with a yellow base.


To get the sunrise look I used the gradient technique.  Paint the polish onto a sponge or a make up wedge then dab onto the nail.  You may have to do it two or three times to get the brightness you want.


My friend suggested to use Vaseline around my nail and said the polish comes right off.  I will try that next time.  Next I took the OPI sheer polish and painted it on the tip of my nail to make the orange and yellow more vibrant.  This step is optional.  


Next, use the black polish and a small brush to do the design.  Each nail can be different and this is your time to be creative!  Switch between palm trees, plants, and birds (or anything else you desire).


I take a second brush with nail polish remover to clean the edges around my nails and wah-lah!
You have a beautiful tropical sunset mani!!!